spring中的jdbcTemplate实际操作类是NamedParameterJdbcTemplate,它是spring对jdbc的一次简单封装,里面封装好了增删改查的方法,使用原生的sql语句操作数据库,效率会比ssm或ssh框架都要高很多。
一般使用spring+springmvc就可以搭建一个效率非常高的web项目了,下面我们将搭建一个spring jdbcTemplate项目,暂时也不用springmvc来操作界面,也没有做service层,只在dao层对数据库进行增删改查操作。
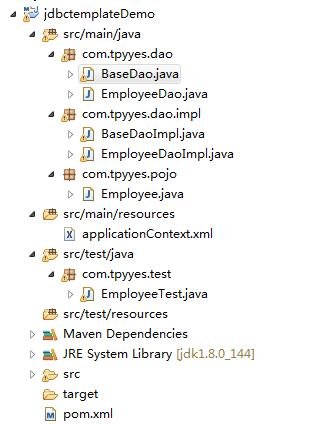
下面的步骤是经过小编自己操作过的,如果看不懂下面的教程,请点击百度云下载本项目:spring jdbcTemplate项目完整版下载,为了便于理解,请先看小编搭建的项目结构,如图:

步骤一:创建一个Employee员工表,sql语句如下:
create table employee(
	id int(10),
	name varchar(100),
	salary int(10)
);
步骤二:创建名为jdbcTemplateDemo的maven项目,在pom.xml文件中导入spring框架以及与jdbc,mysql connector驱动器相关的maven jar包,代码如下:
<dependency>
	<groupId>org.springframework</groupId>
	<artifactId>spring-core</artifactId>
	<version>5.0.2.RELEASE</version>
</dependency>
<dependency>
	<groupId>org.springframework</groupId>
	<artifactId>spring-jdbc</artifactId>
	<version>5.0.2.RELEASE</version>
</dependency>
<dependency>
	<groupId>org.springframework</groupId>
	<artifactId>spring-context</artifactId>
	<version>5.0.2.RELEASE</version>
</dependency>
<dependency>
	<groupId>mysql</groupId>
	<artifactId>mysql-connector-java</artifactId>
	<version>5.1.45</version>
</dependency>
<dependency>
   <groupId>junit</groupId>
   <artifactId>junit</artifactId>
   <version>4.12</version>
</dependency>
<dependency>
	<groupId>org.springframework</groupId>
	<artifactId>spring-test</artifactId>
	<version>5.0.2.RELEASE</version>
	<scope>test</scope>
</dependency>
步骤三:新建Employee员工实体类,代码如下:
public class Employee {
	private int id;
	private String name;
	private int salary;
	//getter setter省略
}
步骤四:jdbcTemplate的好处是因为它相当于ssm框架中的通用mapper类,因此封装好了一个BaseDao类的话,就可以节约很多重复的代码,下面是BaseDao的封装方法,首先定义BaseDao的接口类,如下:
public interface BaseDao {
	//增
	int insert(String sqlString, Object params);
	//删
	int delete(String sqlString, Object params);
	//改
	int update(String sqlString, Object params);
	//查一条
	<T> T findOne(String sqlString, Object params, Class<T> clazz);
	//查列表
	<T> List<T> findRows(String sqlString, Object params, Class<T> clazz);
}
步骤五:定义BaseDaoImpl实现类,实现BaseDao接口中的通用方法,如下:
public class BaseDaoImpl implements BaseDao{

	@Autowired
	protected NamedParameterJdbcTemplate jdbcTemplate;

	public int insert(String sqlString, Object params) {
		SqlParameterSource sqlParam = this.getSqlParam(params);
		return jdbcTemplate.update(sqlString, sqlParam);
	}

	public int delete(String sqlString, Object params) {
		SqlParameterSource sqlParam = this.getSqlParam(params);
		return jdbcTemplate.update(sqlString, sqlParam);
	}

	public int update(String sqlString, Object params) {
		SqlParameterSource sqlParam = this.getSqlParam(params);
		return jdbcTemplate.update(sqlString, sqlParam);
	}

	public <T> T findOne(String sqlString, Object params, Class<T> clazz) {
		List<T> list = this.findRows(sqlString, params, clazz);
		return list.size() == 0 ? null : list.get(0);
	}

	//批量查询
	public <T> List<T> findRows(String sqlString, Object params, Class<T> clazz) {
		SqlParameterSource sqlParam = this.getSqlParam(params);
		List<T> list = jdbcTemplate.query(sqlString, sqlParam, new BeanPropertyRowMapper<T>(clazz));
		return list;
	}

	private SqlParameterSource getSqlParam(Object params) {
		if (params == null)
			return null;
		SqlParameterSource paramSource;
		if(params instanceof MapSqlParameterSource){
			paramSource = (MapSqlParameterSource)params;
		}else{
			paramSource = (BeanPropertySqlParameterSource)params;
		}
		return paramSource;
	}
}
步骤六:在第五个步骤中,有一个@Autowired注解注入jdbcTemplate,之所以可以这样,就是因为我们在applicationContext.xml文件中对NamedParameterJdbcTemplate进行了bean配置,代码如下:
<?xml version="1.0" encoding="UTF-8"?>
<beans xmlns="http://www.springframework.org/schema/beans"
	xmlns:xsi="http://www.w3.org/2001/XMLSchema-instance" xmlns:context="http://www.springframework.org/schema/context"
	xmlns:tx="http://www.springframework.org/schema/tx" xmlns:aop="http://www.springframework.org/schema/aop"
	xmlns:util="http://www.springframework.org/schema/util"
	xsi:schemaLocation="http://www.springframework.org/schema/beans http://www.springframework.org/schema/beans/spring-beans.xsd
       http://www.springframework.org/schema/context http://www.springframework.org/schema/context/spring-context.xsd
       http://www.springframework.org/schema/tx http://www.springframework.org/schema/tx/spring-tx.xsd
       http://www.springframework.org/schema/aop http://www.springframework.org/schema/aop/spring-aop.xsd
       http://www.springframework.org/schema/util http://www.springframework.org/schema/util/spring-util.xsd">

	<context:component-scan base-package="com.tpyyes" />

	<bean id="dataSource"
		class="org.springframework.jdbc.datasource.DriverManagerDataSource">
		<property name="driverClassName" value="com.mysql.jdbc.Driver" />
		<property name="url" value="jdbc:mysql://localhost:3306/test?useUnicode=true" />
		<property name="username" value="root" />
		<property name="password" value="root" />
	</bean>

	<bean id="jdbcTemplate"
		class="org.springframework.jdbc.core.namedparam.NamedParameterJdbcTemplate">
		<constructor-arg ref="dataSource"></constructor-arg>
	</bean>
	<bean id="empDao" class="com.tpyyes.dao.impl.EmployeeDaoImpl"/>
</beans>
步骤七:新建EmployeeDao接口类,加入如下增删改查的方法:
public interface EmployeeDao {
	//增
	int saveEmployee(Employee e);
	//删
	int deleteEmployee(int id);
	//改
	int updateEmployee(Employee e);
	//查
	Employee findEmployee(int id);
}
步骤八:新建EmployeeDaoImpl实现类,实现EmployeeDao接口,并继承我们前面定义的BaseDaoImpl实现类,这样我们就可以使用父类BaseDao中的通用方法了,如下:
public class EmployeeDaoImpl extends BaseDaoImpl implements EmployeeDao{

	public int saveEmployee(Employee e) {
		String sqlStr="insert into employee values (:id,:name,:salary)";
		BeanPropertySqlParameterSource beanParam = new BeanPropertySqlParameterSource(e);
		return this.update(sqlStr, beanParam);
	}

	public int deleteEmployee(int id) {
		String sqlStr="delete from employee where id=:empId";
		MapSqlParameterSource map = new MapSqlParameterSource("empId",id);
		return this.update(sqlStr, map);
	}

	public int updateEmployee(Employee e) {
		String sqlStr = "update employee set name=:name,salary=:salary where id=:id";
		BeanPropertySqlParameterSource beanParam = new BeanPropertySqlParameterSource(e);
		return this.update(sqlStr, map);
	}

	public Employee findEmployee(int id) {
		String sqlStr = "select * from where id=:empId";
		MapSqlParameterSource map = new MapSqlParameterSource("empId",id);
		return this.findOne(sqlStr, map, Employee.class);
	}

}注释:如果不知道MapSqlParameterSource与BeanPropertySqlParameterSource这两个参数封装类的区别,请查看教程:http://www.tpyyes.com/a/javaweb/2017/1210/427.html
步骤九:创建EmployeeTest类,对前面EmployeeDaoImpl实现类中的方法进行junit测试,代码如下:
@RunWith(value = SpringJUnit4ClassRunner.class)
@ContextConfiguration(locations = {"classpath:applicationContext.xml"})
public class EmployeeTest {

	@Autowired
	private EmployeeDao empDao;

	@Test
	public void save(){
		Employee emp = new Employee();
		emp.setId(1);
		emp.setName("哈哈");
		emp.setSalary(5770);
		int num = empDao.saveEmployee(emp);
		System.out.println(num);
	}

	@Test
	public void update() {
		Employee emp = new Employee();
		emp.setId(6);
		emp.setName("李四2");
		emp.setSalary(100);
		int num = empDao.updateEmployee(emp);
		System.out.println(num);
	}

	@Test
	public void delete() {
		int num = empDao.deleteEmployee(1);
		System.out.println(num);
	}

	/**
	 * 项目中还包括单个查询,批量查询,批量更新,批量删除
	 * 完整代码,请下载查看
	 */
}
提醒:jdbcTemplate完整代码在文章开头处有下载链接,如果有问题,请搜索并关注微信公众号“太平洋学习网”,像小编提出优秀的建议。