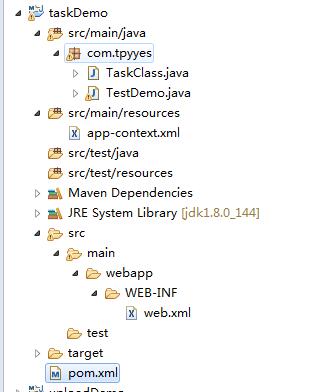
很多人不知道Spring框架里面实际上整合了一个Spring Task定时任务的功能,我们只需要添加一些spring配置,然后在需要执行定时任务的方法上@Scheduled注解,当项目运行之后,就会自动定时调用方法了,@Scheduled注解支持quartz表达式的形式,下面来一起学习Spring Task定时任务吧!

步骤一:我们是spring maven项目,首先我们需要在自己的pom.xml文件中加入spring-context配置,如下所示:
<dependency>
	<groupId>org.springframework</groupId>
	<artifactId>spring-context</artifactId>
	<version>5.0.9.RELEASE</version>
</dependency>
步骤二:我们在项目中新建一个app-context.xml的spring配置文件,用来扫描@Scheduled注解中定义的定时方法,代码如下:
<?xml version="1.0" encoding="UTF-8"?>
<beans xmlns="http://www.springframework.org/schema/beans"
	xmlns:xsi="http://www.w3.org/2001/XMLSchema-instance" xmlns:p="http://www.springframework.org/schema/p"
	xmlns:context="http://www.springframework.org/schema/context"
	xmlns:aop="http://www.springframework.org/schema/aop"
	xmlns:tx="http://www.springframework.org/schema/tx"
	xmlns:task="http://www.springframework.org/schema/task"
	xsi:schemaLocation="http://www.springframework.org/schema/beans http://www.springframework.org/schema/beans/spring-beans.xsd
        http://www.springframework.org/schema/context http://www.springframework.org/schema/context/spring-context.xsd
        http://www.springframework.org/schema/aop http://www.springframework.org/schema/aop/spring-aop.xsd
        http://www.springframework.org/schema/tx http://www.springframework.org/schema/tx/spring-tx.xsd
        http://www.springframework.org/schema/task http://www.springframework.org/schema/task/spring-task.xsd">

    <!-- 自动扫描项目包文件 -->
    <context:component-scan base-package="com.tpyyes" />
    <!-- 定时任务扫描驱动 -->
    <task:annotation-driven scheduler="myScheduler" mode="proxy"/>
    <task:scheduler id="myScheduler" pool-size="10"/>
</beans>
步骤三:定义定时任务,下面有两个需要执行的方法,要注意,一定不要忘记添加“@Component”这个注解,代码如下:
package com.tpyyes;

import java.util.Date;
import org.springframework.scheduling.annotation.Scheduled;
import org.springframework.stereotype.Component;

@Component
public class TaskClass {

	@Scheduled(cron="0/3 * * * * *")
	public void cronRun(){
		System.out.println("每隔3秒执行 " + new Date());
	}

	@Scheduled(initialDelay=3000,fixedRate=1000)
	public void delayRun(){
		System.out.println("延时3秒之后,每隔1秒执行 " + new Date());
	}

}
备注:initialDelay属性表示初始化的时候延时N秒,fixedRate属性表示每隔N秒执行一次,cron代表的是quartz cron表达式。
步骤四:测试Spring Task定时任务,我们在main方法中进行,代码如下:
package com.tpyyes;

import org.springframework.context.ApplicationContext;
import org.springframework.context.support.ClassPathXmlApplicationContext;

public class TestDemo {
	public static void main(String[] args) {
	    //启动spring
	    ApplicationContext ctx = new ClassPathXmlApplicationContext("app-context.xml");
	}
}
输出结果如下:
每隔3秒执行 Thu Sep 13 14:06:18 CST 2018
延时3秒之后,每隔1秒执行 Thu Sep 13 14:06:19 CST 2018
延时3秒之后,每隔1秒执行 Thu Sep 13 14:06:20 CST 2018
延时3秒之后,每隔1秒执行 Thu Sep 13 14:06:21 CST 2018
每隔3秒执行 Thu Sep 13 14:06:21 CST 2018