android Animation动画效果经常有用到,动画效果有fade,zoom,slide,move等各种动画,android的Animation需要自己定义动画xml文件,然后通过下面的方法来加载我们的动画效果。
Animation animation = AnimationUtils.loadAnimation(getApplicationContext(),
   R.anim.myanimation);
//图片对象开始动画效果
image.startAnimation(animation);
例如myAnimation是res/anim文件夹下面的myAnimation.xml文件里面自定义的动画效果。
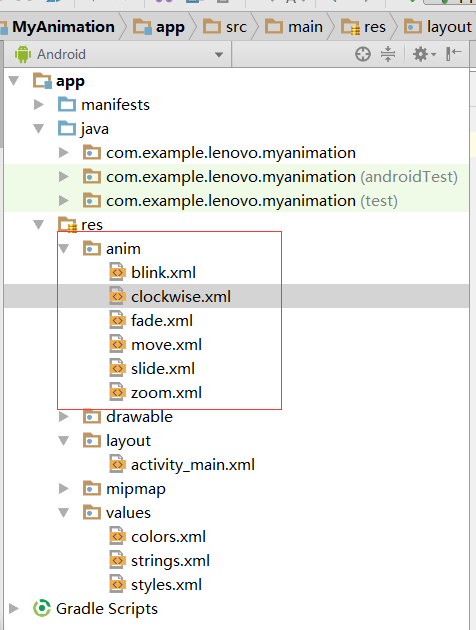
下面来开始学习如何使用android animation动画效果,本案例采用的是android studio2.3.3,界面采用了ConstraintLayout布局,这是新出的布局,这个布局可以随意拖动里面的控件,非常的方便,在activity_main.xml文件中定义的各种Button按钮位置自己定,如果你的开发工具不支持ConstraintLayout布局可能会在这一步报错,自己随意定义几个按钮就可以了,只要点击事件一样的就好,无所谓,先看看我的项目目录结构。

第一步:在activity_main.xml文件中添加每种动画效果对应的按钮,代码如下。
<?xml version="1.0" encoding="utf-8"?>
<android.support.constraint.ConstraintLayout xmlns:android="http://schemas.android.com/apk/res/android"
    xmlns:app="http://schemas.android.com/apk/res-auto"
    xmlns:tools="http://schemas.android.com/tools"
    android:layout_width="match_parent"
    android:layout_height="match_parent"
    tools:context="com.example.lenovo.myanimation.MainActivity">

    <TextView
        android:layout_width="wrap_content"
        android:layout_height="wrap_content"
        android:text="Animations动画展示"
        android:id="@+id/textView"
        android:textSize="35dp"
        android:layout_alignParentTop="true"
        android:layout_centerHorizontal="true"
        app:layout_constraintTop_toTopOf="parent"
        android:layout_marginTop="16dp"
        app:layout_constraintRight_toRightOf="parent"
        app:layout_constraintLeft_toLeftOf="parent" />

    <TextView
        android:layout_width="wrap_content"
        android:layout_height="wrap_content"
        android:text="太平洋学习网"
        android:id="@+id/textView2"
        android:textColor="#ff3eff0f"
        android:textSize="35dp"
        android:layout_below="@+id/textView"
        android:layout_centerHorizontal="true"
        android:layout_marginTop="18dp"
        app:layout_constraintTop_toBottomOf="@+id/textView"
        app:layout_constraintRight_toRightOf="parent"
        app:layout_constraintLeft_toLeftOf="parent" />

    <ImageView
        android:layout_width="wrap_content"
        android:layout_height="wrap_content"
        android:id="@+id/imageView"
        android:src="@drawable/cat"
        android:layout_below="@+id/textView2"
        android:layout_alignRight="@+id/textView2"
        android:layout_alignEnd="@+id/textView2"
        android:layout_alignLeft="@+id/textView"
        android:layout_alignStart="@+id/textView"
        android:layout_marginTop="34dp"
        app:layout_constraintTop_toBottomOf="@+id/textView2"
        app:layout_constraintRight_toRightOf="parent"
        app:layout_constraintLeft_toLeftOf="parent" />

    <Button
        android:layout_width="wrap_content"
        android:layout_height="wrap_content"
        android:text="zoom缩放"
        android:id="@+id/button"
        android:layout_below="@+id/imageView"
        android:layout_alignParentLeft="true"
        android:layout_alignParentStart="true"
        android:onClick="clockwise"
        tools:ignore="MissingConstraints"
        android:layout_marginLeft="24dp"
        app:layout_constraintLeft_toLeftOf="parent"
        app:layout_constraintTop_toTopOf="parent"
        android:layout_marginTop="357dp" />

    <Button
        android:layout_width="wrap_content"
        android:layout_height="wrap_content"
        android:text="clockwise右转"
        android:id="@+id/button2"
        android:layout_alignTop="@+id/button"
        android:layout_centerHorizontal="true"
        android:onClick="zoom"
        tools:ignore="MissingConstraints"
        app:layout_constraintBottom_toBottomOf="parent"
        android:layout_marginBottom="16dp"
        app:layout_constraintRight_toLeftOf="@+id/button6"
        android:layout_marginRight="22dp" />

    <Button
        android:layout_width="wrap_content"
        android:layout_height="wrap_content"
        android:text="fade淡入淡出"
        android:id="@+id/button3"
        android:layout_alignTop="@+id/button2"
        android:layout_alignParentRight="true"
        android:layout_alignParentEnd="true"
        android:onClick="fade"
        tools:ignore="MissingConstraints"
        android:layout_marginRight="1dp"
        app:layout_constraintRight_toRightOf="parent"
        app:layout_constraintTop_toTopOf="parent"
        android:layout_marginTop="357dp" />

    <Button
        android:layout_width="wrap_content"
        android:layout_height="wrap_content"
        android:text="blink闪烁"
        android:onClick="blink"
        android:id="@+id/button4"
        android:layout_below="@+id/button"
        android:layout_alignParentLeft="true"
        android:layout_alignParentStart="true"
        tools:ignore="MissingConstraints"
        android:layout_marginLeft="16dp"
        app:layout_constraintLeft_toLeftOf="parent"
        app:layout_constraintBottom_toBottomOf="parent"
        android:layout_marginBottom="16dp" />

    <Button
        android:layout_width="wrap_content"
        android:layout_height="wrap_content"
        android:text="move移动"
        android:onClick="move"
        android:id="@+id/button5"
        android:layout_below="@+id/button2"
        android:layout_alignRight="@+id/button2"
        android:layout_alignEnd="@+id/button2"
        android:layout_alignLeft="@+id/button2"
        android:layout_alignStart="@+id/button2"
        tools:ignore="MissingConstraints"
        app:layout_constraintTop_toTopOf="parent"
        android:layout_marginTop="357dp"
        app:layout_constraintRight_toLeftOf="@+id/button3"
        android:layout_marginRight="31dp"
        app:layout_constraintLeft_toRightOf="@+id/button"
        android:layout_marginLeft="8dp"
        app:layout_constraintHorizontal_bias="1.0" />

    <Button
        android:layout_width="wrap_content"
        android:layout_height="wrap_content"
        android:text="slide滑动"
        android:onClick="slide"
        android:id="@+id/button6"
        android:layout_below="@+id/button3"
        android:layout_toRightOf="@+id/textView"
        android:layout_toEndOf="@+id/textView"
        tools:ignore="MissingConstraints"
        android:layout_marginRight="16dp"
        app:layout_constraintRight_toRightOf="parent"
        app:layout_constraintBottom_toBottomOf="parent"
        android:layout_marginBottom="16dp" />

</android.support.constraint.ConstraintLayout>
第二步:在res下新建anim文件夹,名字最好起成anim,然后右键new----animation resource file新建如下这些文件,请一一新建,不急。
新建文件res/anim/clockwise.xml,代码如下
<?xml version="1.0" encoding="utf-8"?>
<set xmlns:android="http://schemas.android.com/apk/res/android">
    <scale xmlns:android="http://schemas.android.com/apk/res/android"
        android:fromXScale="0.5"
        android:toXScale="3.0"
        android:fromYScale="0.5"
        android:toYScale="3.0"
        android:duration="5000"
        android:pivotX="50%"
        android:pivotY="50%" >
    </scale>

    <scale xmlns:android="http://schemas.android.com/apk/res/android"
        android:startOffset="5000"
        android:fromXScale="3.0"
        android:toXScale="0.5"
        android:fromYScale="3.0"
        android:toYScale="0.5"
        android:duration="5000"
        android:pivotX="50%"
        android:pivotY="50%" >
    </scale>

</set>
新建文件res/anim/zoom.xml,代码如下
<?xml version="1.0" encoding="utf-8"?>
<set xmlns:android="http://schemas.android.com/apk/res/android">
    <rotate xmlns:android="http://schemas.android.com/apk/res/android"
        android:fromDegrees="0"
        android:toDegrees="360"
        android:pivotX="50%"
        android:pivotY="50%"
        android:duration="5000" >
    </rotate>

    <rotate xmlns:android="http://schemas.android.com/apk/res/android"
        android:startOffset="5000"
        android:fromDegrees="360"
        android:toDegrees="0"
        android:pivotX="50%"
        android:pivotY="50%"
        android:duration="5000" >
    </rotate>

</set>
新建文件res/anim/fade.xml,代码如下
<?xml version="1.0" encoding="utf-8"?>
<set xmlns:android="http://schemas.android.com/apk/res/android"
    android:interpolator="@android:anim/accelerate_interpolator" >
    <alpha
        android:fromAlpha="0"
        android:toAlpha="1"
        android:duration="2000" >
    </alpha>

    <alpha
        android:startOffset="2000"
        android:fromAlpha="1"
        android:toAlpha="0"
        android:duration="2000" >
    </alpha>
</set>
新建文件res/anim/blink.xml,代码如下
<?xml version="1.0" encoding="utf-8"?>
<set xmlns:android="http://schemas.android.com/apk/res/android">
    <alpha android:fromAlpha="0.0"
        android:toAlpha="1.0"
        android:interpolator="@android:anim/accelerate_interpolator"
        android:duration="600"
        android:repeatMode="reverse"
        android:repeatCount="infinite"/>
</set>
新建文件res/anim/move.xml,代码如下
<?xml version="1.0" encoding="utf-8"?>
<set
    xmlns:android="http://schemas.android.com/apk/res/android"
    android:interpolator="@android:anim/linear_interpolator"
    android:fillAfter="true">

    <translate
        android:fromXDelta="0%p"
        android:toXDelta="75%p"
        android:duration="800" />
</set>
新建文件res/anim/slide.xml,代码如下
<?xml version="1.0" encoding="utf-8"?>
<set xmlns:android="http://schemas.android.com/apk/res/android"
    android:fillAfter="true" >
    <scale
        android:duration="500"
        android:fromXScale="1.0"
        android:fromYScale="1.0"
        android:interpolator="@android:anim/linear_interpolator"
        android:toXScale="1.0"
        android:toYScale="0.0" />
</set>
第三步:在MainActivity.java文件中实现动画效果的Button点击事件,代码如下,非常简单的。
package com.example.lenovo.myanimation;

import android.support.v7.app.AppCompatActivity;
import android.os.Bundle;
import android.view.View;
import android.view.animation.Animation;
import android.view.animation.AnimationUtils;
import android.widget.ImageView;

public class MainActivity extends AppCompatActivity {

    @Override
    protected void onCreate(Bundle savedInstanceState) {
        super.onCreate(savedInstanceState);
        setContentView(R.layout.activity_main);
    }
    //右转事件
    public void clockwise(View view){
        ImageView image = (ImageView)findViewById(R.id.imageView);
        Animation animation = AnimationUtils.loadAnimation(getApplicationContext(),
                R.anim.clockwise);
        image.startAnimation(animation);
    }

    //缩放事件
    public void zoom(View view){
        ImageView image = (ImageView)findViewById(R.id.imageView);
        Animation animation1 = AnimationUtils.loadAnimation(getApplicationContext(),
                R.anim.zoom);
        image.startAnimation(animation1);
    }

    //淡入淡出事件
    public void fade(View view){
        ImageView image = (ImageView)findViewById(R.id.imageView);
        Animation animation1 =
                AnimationUtils.loadAnimation(getApplicationContext(),
                        R.anim.fade);
        image.startAnimation(animation1);
    }

    //blink闪烁事件
    public void blink(View view){
        ImageView image = (ImageView)findViewById(R.id.imageView);
        Animation animation1 =
                AnimationUtils.loadAnimation(getApplicationContext(),
                        R.anim.blink);
        image.startAnimation(animation1);
    }

    //移动事件
    public void move(View view){
        ImageView image = (ImageView)findViewById(R.id.imageView);
        Animation animation1 =
                AnimationUtils.loadAnimation(getApplicationContext(), R.anim.move);
        image.startAnimation(animation1);
    }

    //slide滑动事件
    public void slide(View view){
        ImageView image = (ImageView)findViewById(R.id.imageView);
        Animation animation1 =
                AnimationUtils.loadAnimation(getApplicationContext(), R.anim.slide);
        image.startAnimation(animation1);
    }
}
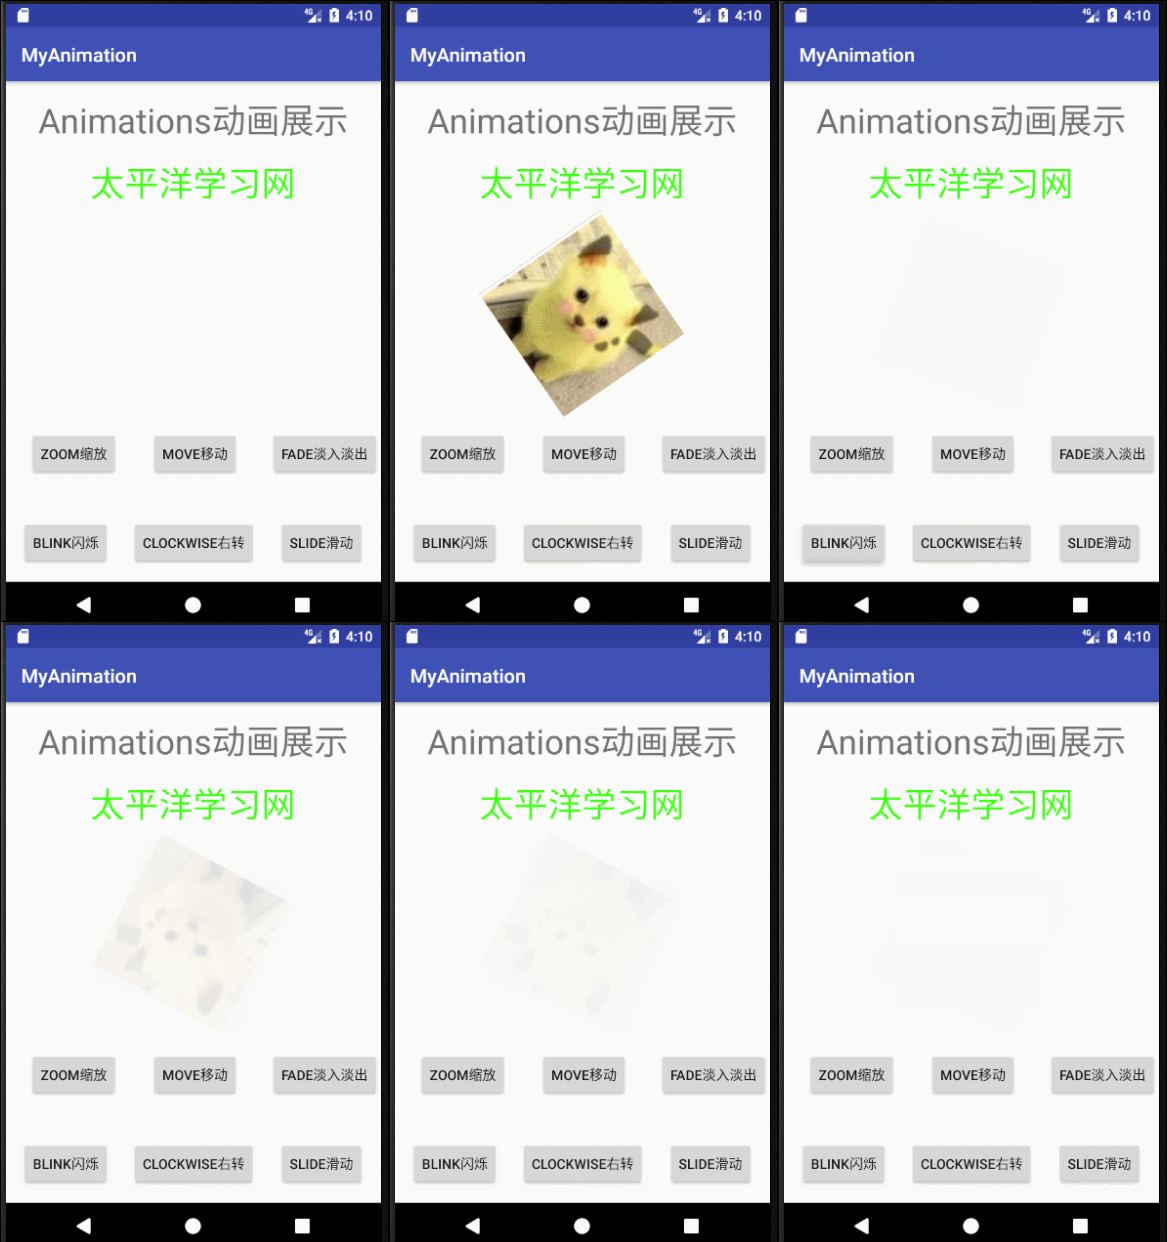
完成之后运行项目效果如图所示,由于图片过大,这里只展现部分动画效果。
