android Fragment和我们html的<frame>标签,jsp的<include>标签,php的<?php include 'footer.php';?>标签差不多是一个道理,Fragment就如同一张网页,可以放button按钮,image图片,text文本域等等,在android中,Fragment就是被包含在activity控件中的,下面有两个案例将简单介绍一下Fragment的使用,先看看本案例目录。
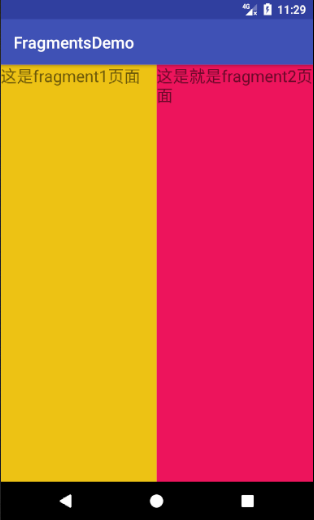
案例一:在activity_main.xml页面中嵌入两个Fragment页面。
1:在res/layout下新建frament1.xml(新建xml后系统默认自带前缀fragment_,不管它),然后在frament1.xml里面添加一个TextView文本域,代码如下。
<FrameLayout xmlns:android="http://schemas.android.com/apk/res/android"
    xmlns:tools="http://schemas.android.com/tools"
    android:layout_width="match_parent"
    android:layout_height="match_parent"
    android:background="#edc214"
    tools:context="layout.fragment1">

    <!-- TODO: Update blank fragment layout -->
    <TextView
        android:layout_width="match_parent"
        android:layout_height="match_parent"
        android:textSize="20dp"
        android:text="这是fragment1页面" />

</FrameLayout>
2:新建另外一个frament2.xml,也是添加一个TextView文本域,代码如下。
<FrameLayout xmlns:android="http://schemas.android.com/apk/res/android"
    xmlns:tools="http://schemas.android.com/tools"
    android:layout_width="match_parent"
    android:layout_height="match_parent"
    android:background="#ed145c"
    tools:context="layout.fragment2">

    <!-- TODO: Update blank fragment layout -->
    <TextView
        android:layout_width="match_parent"
        android:layout_height="match_parent"
        android:textSize="20dp"
        android:text="这是就是fragment2页面" />

</FrameLayout>
3:在activity_main.xml中加载这两个Fragment,代码如下。
<?xml version="1.0" encoding="utf-8"?>
<LinearLayout  xmlns:android="http://schemas.android.com/apk/res/android"
    xmlns:tools="http://schemas.android.com/tools"
    android:id="@+id/activity_main"
    android:layout_width="match_parent"
    android:layout_height="match_parent"
    android:orientation="horizontal" //水平不换行
    tools:context="com.baidu.fragmentsdemo.MainActivity">

    <fragment
        android:name="layout.fragment1" //加载名为fragment1.xml
        android:layout_weight="1"
        android:layout_width="0px"
        android:layout_height="match_parent"
        android:id="@+id/fragment1"/>
    <fragment
        android:name="layout.fragment2" //加载名为fragment2.xml
        android:layout_weight="1"
        android:layout_width="0px"
        android:layout_height="match_parent"
        android:id="@+id/fragment2"/>
</LinearLayout>
运行之后的效果如图所示。

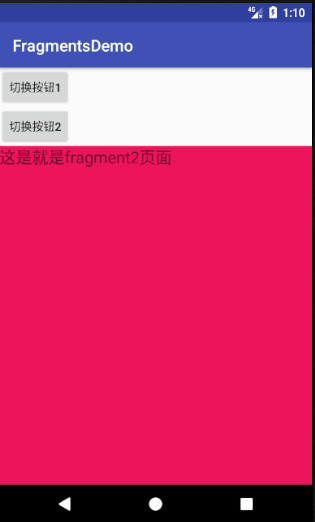
案例二:使用button按钮切换界面,并加载显示fragment1和fragment2这两个控件。
1:frament1.xml和frament2.xml里面的代码不用作任何改变。
2:把activity_main.xml更改一下,在里面添加两个切换界面的button按钮和一个承载Fragment的容器FrameLayout,代码如下。
<?xml version="1.0" encoding="utf-8"?>
<LinearLayout  xmlns:android="http://schemas.android.com/apk/res/android"
    xmlns:tools="http://schemas.android.com/tools"
    android:id="@+id/activity_main"
    android:layout_width="match_parent"
    android:layout_height="match_parent"
    android:orientation="vertical" //垂直会换行
    tools:context="com.baidu.fragmentsdemo.MainActivity">

    <Button
        android:layout_width="wrap_content"
        android:layout_height="wrap_content"
        android:text="切换按钮1"
        android:id="@+id/btn1"/>

    <Button
        android:layout_width="wrap_content"
        android:layout_height="wrap_content"
        android:text="切换按钮2"
        android:id="@+id/btn2"/>

    <FrameLayout
        android:layout_width="match_parent"
        android:layout_height="match_parent"
        android:id="@+id/fragment_container"/>
</LinearLayout>
3:为这两个button按钮添加点击事件,切换按钮并将frament1.xml和frament2.xml界面放在FrameLayout容器里面,在MainActivity.java里面实现这个功能,代码如下。
package com.baidu.fragmentsdemo;

import android.support.v4.app.FragmentActivity;
import android.support.v4.app.FragmentManager;
import android.support.v4.app.FragmentTransaction;
import android.support.v7.app.AppCompatActivity;
import android.os.Bundle;
import android.view.View;
import android.widget.Button;
import android.widget.FrameLayout;
import android.widget.Toast;
import layout.fragment1;
import layout.fragment2;

public class MainActivity extends AppCompatActivity {
    private Button button1;
    private Button button2;
    @Override
    protected void onCreate(Bundle savedInstanceState) {
        super.onCreate(savedInstanceState);
        setContentView(R.layout.activity_main);
        button1 = (Button)findViewById(R.id.btn1);
        button2 = (Button)findViewById(R.id.btn2);
        //添加事件
        button1.setOnClickListener(new MyClick1());
        button2.setOnClickListener(new MyClick2());
    }
    //按钮1点击事件
    class MyClick1 implements View.OnClickListener{
        @Override
        public void onClick(View v) {
            FragmentManager manager = getSupportFragmentManager();
            FragmentTransaction transaction = manager.beginTransaction();
            fragment1 fra1 = new fragment1();
            //往FrameLayout里面添加fragment1
            transaction.add(R.id.fragment_container,fra1);
            transaction.commit();
        }
    }
    //按钮二点击事件
    class MyClick2 implements View.OnClickListener{
        @Override
        public void onClick(View v) {
            FragmentManager manager = getSupportFragmentManager();
            FragmentTransaction transaction = manager.beginTransaction();
            fragment2 fra2 = new fragment2();
            //往FrameLayout里面添加fragment1
            transaction.add(R.id.fragment_container,fra2);
            transaction.commit();
        }
    }
}
4:运行app,点击按钮切换,效果如下。
