今天小编将介绍spring boot thymeleaf整合教程,thymeleaf是一个java的模板引擎,它比freemarker模板引擎好用得多,我们都知道javaweb项目如果想要向界面直接传递参数,是html格式前端页面的话,要么只能全站使用Json返回,要么就使用jsp格式的前端页面。
有了thymeleaf templates模板引擎之后,我们我们就可以直接将后台参数传递到HTML页面中了,它就跟jsp的JSTL标签一样,有各种thymeleaf标签供大家使用,后面小编会介绍到,今天将会带大家在springboot中整合thymeleaf模板引擎,将会涉及到以下技术:
Spring Boot 1.4.2.RELEASE
Spring 4.3.4.RELEASE
Thymeleaf 2.1.5.RELEASE
Tomcat Embed 8.5.6
Maven 3
Java 8
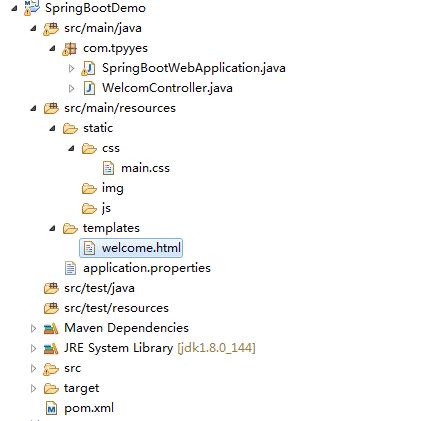
为了便于大家对thymeleaf的理解,小编分享一下thymeleaf项目的默认格式,js,css,img等资源文件都需要遵从这种结构,并且默认都是在src/main/resources/下面的static文件夹下,而HTML文件则必须要在templates模板文件夹下面,如下所示:

spring boot thymeleaf整合步骤如下:
第一步:在pom.xml文件中加入spring boot与thymeleaf的maven jar包,如下所示:
<project xmlns="http://maven.apache.org/POM/4.0.0"
xmlns:xsi="http://www.w3.org/2001/XMLSchema-instance"
xsi:schemaLocation="http://maven.apache.org/POM/4.0.0
http://maven.apache.org/xsd/maven-4.0.0.xsd">
  <modelVersion>4.0.0</modelVersion>
  <groupId>com.tpyyes</groupId>
  <artifactId>wordDemo</artifactId>
  <version>0.0.1-SNAPSHOT</version>
  <packaging>war</packaging>
	<parent>
		<groupId>org.springframework.boot</groupId>
		<artifactId>spring-boot-starter-parent</artifactId>
		<version>1.4.2.RELEASE</version>
	</parent>

	<properties>
		<java.version>1.8</java.version>
	</properties>

	<dependencies>

		<dependency>
			<groupId>org.springframework.boot</groupId>
			<artifactId>spring-boot-starter-thymeleaf</artifactId>
		</dependency>

		<!-- hot swapping, disable cache for template, enable live reload -->
		<dependency>
			<groupId>org.springframework.boot</groupId>
			<artifactId>spring-boot-devtools</artifactId>
			<optional>true</optional>
		</dependency>

		<!-- Optional, for bootstrap -->
		<dependency>
			<groupId>org.webjars</groupId>
			<artifactId>bootstrap</artifactId>
			<version>3.3.7</version>
		</dependency>

	</dependencies>

	<build>
		<plugins>
			<!-- Package as an executable jar/war -->
			<plugin>
				<groupId>org.springframework.boot</groupId>
				<artifactId>spring-boot-maven-plugin</artifactId>
			</plugin>
		</plugins>
	</build>
</project>
步骤二:添加spring boot的启动类,如小编的SpringBootWebApplication类,里面的代码如下:
package com.tpyyes;

import org.springframework.boot.SpringApplication;
import org.springframework.boot.autoconfigure.SpringBootApplication;

@SpringBootApplication
public class SpringBootWebApplication {

	public static void main(String[] args) {
		SpringApplication.run(SpringBootWebApplication.class, args);
	}
}步骤三:创建一个WelcomController.java的类,用于界面的跳转,如果welcome.html页面在src/main/resources/templates/welcome.html文件夹下,它就会自动找到该文件:
package com.tpyyes;

import java.util.Map;

import org.springframework.beans.factory.annotation.Value;
import org.springframework.stereotype.Controller;
import org.springframework.web.bind.annotation.RequestMapping;

@Controller
public class WelcomController {

	// 注入application.properties文件中key为com.tpyyes的值
	@Value("${com.tpyyes:没有key就显示我吧!}")
	private String message;

	@RequestMapping("/")
	public String welcome(Map<String, Object> model) {
		model.put("message", message);
		return "welcome";
	}
}
上方代码中涉及到了一个application.properties配置文件,该配置文件可以配置数据库连接信息,也可以配置一些常量等信息,介绍这个是要告诉各位如何在controller类中获取配置文件的值,里面的代码如下:
com.tpyyes=hello world
步骤四:新建templates模板文件夹,在src/main/resources/templates/文件夹中加入welcome.html文件,用于显示WelcomController类中向前台传递的值(注意:需要将<html>标签改成<html xmlns:th="http://www.thymeleaf.org">特有的标签)
th:text:显示文本内容
th:href:显示路径
<!DOCTYPE html>
<html xmlns:th="http://www.thymeleaf.org">
<head>
<meta charset="UTF-8"/>
<title>spring boot使用示例</title>
<link rel="stylesheet" th:href="@{/css/main.css}" />
</head>
<body>
<div class="msg" th:text='${message}'></div>
</body>
</html>
welcome.html文件涉及到加载mian.css样式文件的标签,使用th:href标签就可以引入这个css了,代码如下:
@CHARSET "UTF-8";
.msg{
	font-size:30px;
	color:red;
}
Spring Boot启动测试:
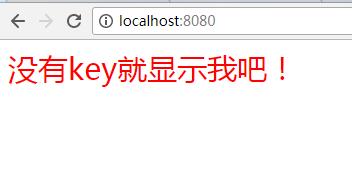
启动SpringBootWebApplication类中的main方法,spring boot启动成功之后,输入http://localhost:8080访问效果如图所示:

如果我们把application.properties配置文件里面的内容清空,则会显示如下的效果:

thymeleaf模板引擎还有很多标签需要学习,比如循环遍历,显示value值等,具有和JSTL同意的效果。