ssh框架是spring+struts2+hibernate框架的简称,也是目前非常火的一项开发框架组合,struts2的action是多实例的,下面来对ssh框架进行整合,如果你按照下面的操作进行,我保证100%会整合成功!
这里使用myeclipse开发工具来开发,首先我们新建一个web project项目,我的项目名称为testDemo,然后在WEB-INF/lib文件夹下添加如下这些ssh框架整合jar包,点击进入百度云下载:
http://pan.baidu.com/s/1bp1J5vT
配置web.xml文件,添加spring核心监听器和struts2核心过滤器,代码如下:
<?xml version="1.0" encoding="UTF-8"?>
<web-app xmlns:xsi=" http://www.w3.org/2001/XMLSchema-instance" xmlns="http://java.sun.com/xml/ns/javaee"
 xsi:schemaLocation="http://java.sun.com/xml/ns/javaee/web-app_3_0.xsd" id="WebApp_ID" version="3.0">

 <!-- 核心监听器,监听tomcat应用服务器-->
 <listener>
  <listener-class>org.springframework.web.context.ContextLoaderListener</listener-class>
 </listener>

 <context-param>
  <param-name>contextConfigLocation</param-name>
  <param-value>classpath:applicationContext.xml</param-value>
 </context-param>

 <!--struts核心过滤器 -->
 <filter>
  <filter-name>struts2</filter-name>
  <filter-class>org.apache.struts2.dispatcher.ng.filter.StrutsPrepareAndExecuteFilter</filter-class>
 </filter>
 <filter-mapping>
  <filter-name>struts2</filter-name>
  <url-pattern>*.action</url-pattern>
 </filter-mapping>

   <display-name>testDemo</display-name>
   <welcome-file-list>
     <welcome-file>index.html</welcome-file>
     <welcome-file>index.htm</welcome-file>
     <welcome-file>index.jsp</welcome-file>
     <welcome-file>default.html</welcome-file>
     <welcome-file>default.htm</welcome-file>
     <welcome-file>default.jsp</welcome-file>
   </welcome-file-list>
</web-app>
在src目录下添加applicationContext.xml文件,并配置数据库连接池,sessionFactory工厂以及事务回滚等信息,配置如下:
<?xml version="1.0" encoding="UTF-8"?>
<beans xmlns="http://www.springframework.org/schema/beans"
 xmlns:xsi="http://www.w3.org/2001/XMLSchema-instance" xmlns:p="http://www.springframework.org/schema/p"
 xmlns:context="http://www.springframework.org/schema/context"
 xmlns:aop="http://www.springframework.org/schema/aop" xmlns:tx="http://www.springframework.org/schema/tx"
 xsi:schemaLocation=" http://www.springframework.org/schema/beans http://www.springframework.org/schema/beans/spring-beans-4.1.xsd
 http://www.springframework.org/schema/aop http://www.springframework.org/schema/aop/spring-aop-4.1.xsd
 http://www.springframework.org/schema/tx http://www.springframework.org/schema/tx/spring-tx-4.1.xsd
 http://www.springframework.org/schema/context http://www.springframework.org/schema/context/spring-context-4.1.xsd">

 <!-- 导入外部的properties配置文件 -->
 <context:property-placeholder location="classpath:db.properties"/>

 <!-- 配置c3p0数据源 -->
  <bean id="dataSource" class="com.mchange.v2.c3p0.ComboPooledDataSource" destroy-method="close">
  <property name="jdbcUrl" value="${jdbcUrl}"></property>
  <property name="driverClass" value="${driverClass}"></property>
  <property name="user" value="${user}"></property>
  <property name="password" value="${password}"></property>
  <!--初始化时获取三个连接,取值应在minPoolSize与maxPoolSize之间。Default: 3 -->
  <property name="initialPoolSize" value="${initialPoolSize}"></property>
  <!--连接池中保留的最小连接数。Default: 3 -->
  <property name="minPoolSize" value="3"></property>
  <!--连接池中保留的最大连接数。Default: 20 -->
  <property name="maxPoolSize" value="${maxPoolSize}"></property>
  <!--当连接池中的连接耗尽的时候c3p0一次同时获取的连接数。Default: 3 -->
  <property name="acquireIncrement" value="3"></property>
  <!--最大空闲时间,1800秒内未使用则连接被丢弃,若为0则永不丢弃。Default: 0 -->
  <property name="maxIdleTime" value="1800"></property>
 </bean>

 <bean id="sessionFactory"
  class="org.springframework.orm.hibernate4.LocalSessionFactoryBean">
  <property name="dataSource" ref="dataSource"></property>
  <property name="hibernateProperties">
   <props>
    <prop key="hibernate.dialect">org.hibernate.dialect.MySQL5Dialect</prop>
    <prop key="hibernate.show_sql">true</prop>
    <prop key="hibernate.hbm2ddl.auto">update</prop>
    <prop key="javax.persistence.validation.mode">none</prop>
   </props>
  </property>
  <property name="mappingLocations">
   <list>
    <value>classpath:com/test/entity/*.hbm.xml</value>
   </list>
  </property>
 </bean>

 <!-- 事务管理 -->
 <bean id="txManager" class="org.springframework.orm.hibernate4.HibernateTransactionManager">
  <property name="sessionFactory" ref="sessionFactory"></property>
 </bean>

 <!-- 事务通知 -->
 <tx:advice id="txAdvice" transaction-manager="txManager">
  <tx:attributes>
   <tx:method name="get*" read-only="true"/>
   <tx:method name="find*" read-only="true"/>
   <tx:method name="list*" read-only="true"/>
   <!-- 其它方法采用事务回滚 -->
   <tx:method name="*" rollback-for="Throwable"/>
  </tx:attributes>
 </tx:advice>

 <!-- aop,配置哪些类需要切入事务 -->
 <aop:config>
     <!-- <aop:pointcut expression="bean(*Service)" id="serviceOperation"/> -->
     <aop:pointcut expression="execution(* com.test..service.impl.*.*(..))" id="serviceOperation"/>
     <aop:advisor advice-ref="txAdvice" pointcut-ref="serviceOperation"/>
 </aop:config>

 <!-- 引入其它spring配置文件 -->
    <import resource="classpath:com/test/conf/*-spring.xml"/>

</beans>
在db.properties里面配置数据库连接用户名,密码等相关信息,以下的连接池个数数据只是测试,请根据具体项目来设置。:
jdbcUrl=jdbc:mysql://localhost:3306/testDemo?useUnicode=true&characterEncoding=utf8
driverClass=com.mysql.jdbc.Driver
user=root
password=root
initialPoolSize=10
maxPoolSize=30
配置log4j.properties相关的日志信息,用户输出日志,供以后调试程序之用:
log4j.appender.stdout=org.apache.log4j.ConsoleAppender
log4j.appender.stdout.Target=System.out
log4j.appender.stdout.layout=org.apache.log4j.PatternLayout
log4j.appender.stdout.layout.ConversionPattern=%d{ABSOLUTE} %5p [%t] %c{1}:%L - %m%n

log4j.rootLogger=warn, stdout, R
log4j.logger.cn.itcast=debug
log4j.appender.R=org.apache.log4j.DailyRollingFileAppender
#日志输出位置
log4j.appender.R.File=D:/test/testDemo.log
log4j.appender.R.layout=org.apache.log4j.PatternLayout
log4j.appender.R.layout.ConversionPattern=%d [%t] %5p  %c - %m%n
添加struts.xml,并配置action视图映射器相关的信息:
<?xml version="1.0" encoding="UTF-8"?>
<!DOCTYPE struts PUBLIC
 "-//Apache Software Foundation//DTD Struts Configuration 2.3//EN"
 "http://struts.apache.org/dtds/struts-2.3.dtd">

<struts>
 <!-- 禁止动态方法访问 -->
 <constant name="struts.enable.DynamicMethodInvocation" value="false"></constant>
 <!--设置成开发者模式  -->
 <constant name="struts.devMode" value="true"></constant>
 <!-- 配置拓展名为action -->
 <constant name="struts.action.extention" value="action"></constant>
 <!-- 把主题配置成simple -->
 <constant name="struts.ui.theme" value="simple"></constant>

 <!-- 包含action映射信息的struts配置文件 -->
 <include file="com/test/conf/test-struts.xml"></include>
</struts>
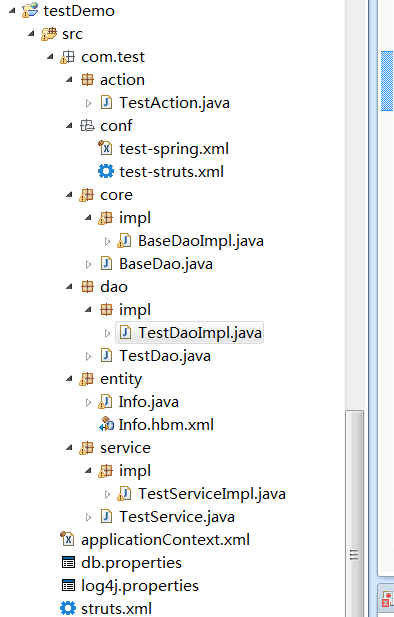
下面是ssh框架的整合测试,请先根据以下样式新建相关文件和文件夹,以便于测试时使用:

以上的test-spring.xml文件配置的是依赖注入的信息,Info.hbm.xml文件配置的是实体类与数据库的映射信息,都对应了applicationContext.xml里面引入的文件,test-struts.xml配置的是视图映射相关的信息,在struts.xml里面导入,以下是这三个文件里面所需要配置的内容。
test-spring.xml依赖注入文件:
<?xml version="1.0" encoding="UTF-8"?>
<beans xmlns="http://www.springframework.org/schema/beans"
	xmlns:xsi="http://www.w3.org/2001/XMLSchema-instance" xmlns:p="http://www.springframework.org/schema/p"
	xmlns:context="http://www.springframework.org/schema/context"
	xmlns:aop="http://www.springframework.org/schema/aop" xmlns:tx="http://www.springframework.org/schema/tx"
	xsi:schemaLocation=" http://www.springframework.org/schema/beans http://www.springframework.org/schema/beans/spring-beans-4.1.xsd
	http://www.springframework.org/schema/aop http://www.springframework.org/schema/aop/spring-aop-4.1.xsd
	http://www.springframework.org/schema/tx http://www.springframework.org/schema/tx/spring-tx-4.1.xsd
	http://www.springframework.org/schema/context http://www.springframework.org/schema/context/spring-context-4.1.xsd">

    <bean id="testDao" class="com.test.dao.impl.TestDaoImpl" >
    	<property name="sessionFactory" ref="sessionFactory"></property>
    </bean>

    <!-- 扫描业务层的注解 -->
    <context:component-scan base-package="com.test.service.impl.TestServiceImpl"></context:component-scan>
</beans>
Info.hbm.xml数据库映射文件配置,根据你的具体情况,也可以用软件自动生成:
<?xml version="1.0" encoding="utf-8"?>
<!DOCTYPE hibernate-mapping PUBLIC "-//Hibernate/Hibernate Mapping DTD 3.0//EN"
"http://hibernate.sourceforge.net/hibernate-mapping-3.0.dtd">

<hibernate-mapping>
    <class name="com.test.entity.Info" table="info">
        <id name="infoId" type="java.lang.String">
            <column name="info_id" length="32"/>
            <generator class="uuid.hex" />
        </id>
        <property name="type" type="java.lang.String">
            <column name="type" length="10" />
        </property>
        <property name="source" type="java.lang.String">
            <column name="source" length="50" />
        </property>
        <property name="title" type="java.lang.String">
            <column name="title" length="100" not-null="true" />
        </property>
        <property name="content" type="text">
            <column name="content" />
        </property>
        <property name="memo" type="java.lang.String">
            <column name="memo" length="200" />
        </property>
        <property name="creator" type="java.lang.String">
            <column name="creator" length="10" />
        </property>
        <property name="createTime" type="java.sql.Timestamp">
            <column name="create_time" length="19" />
        </property>
        <property name="state" type="java.lang.String">
            <column name="state" length="1" />
        </property>
    </class>
</hibernate-mapping>
test-struts.xml视图映射文件配置:
<?xml version="1.0" encoding="UTF-8" ?>
<!DOCTYPE struts PUBLIC
	"-//Apache Software Foundation//DTD Struts Configuration 2.3//EN"
	"http://struts.apache.org/dtds/struts-2.3.dtd">
<struts>
	<package name="testAction" namespace="/sys" extends="struts-default">
		<action name="test_*" class="com.test.action.TestAction" method="{1}">
			<result name="{1}">/WEB-INF/jsp/{1}.jsp</result>
		</action>
	</package>
</struts>
经过上面这些配置,就可以写dao接口相关的信息了,要特别注意的是,接口实现类要继承HibernateDaoSupport,否则在service层实现类注入dao接口的时候会报错的,您可以写一个ssh框架的baseDao,然后在你的dao接口实现类上继承baseDaoImpl接口实现类,因为baseDaoImpl继承了HibernateDaoSupport。
ssh框架baseDao方法封装的方法请进入:
http://tpyyes.com/a/javaweb/2016/0918/16.html
下面看看我的dao层写法:
package com.test.dao;
import com.test.core.BaseDao;
import com.test.entity.Info;
public interface TestDao extends BaseDao<Info>{

}
以及dao的实现类:
package com.test.dao.impl;
import com.test.core.impl.BaseDaoImpl;
import com.test.dao.TestDao;
import com.test.entity.Info;
public class TestDaoImpl extends BaseDaoImpl<Info> implements TestDao{

}
如上所示继承baseDao就可以了,然后在action控制层写你的代码吧!